Ingredients
Scale
- 2 large boneless, skinless chicken thighs (or breasts if preferred)
- 1 cup buttermilk (or 1 cup milk mixed with 1 tablespoon lemon juice as a substitute)
- 1 teaspoon garlic powder
- 1 teaspoon onion powder
- 1 teaspoon paprika
- 1/2 teaspoon salt, plus more for seasoning
- 1/2 teaspoon black pepper
- 1 cup all-purpose flour
- 1/2 cup cornstarch (for extra crispiness)
- Vegetable oil for frying (about 2-3 cups)
- 4 sandwich buns (brioche or potato buns work wonderfully)
- 1 cup shredded cabbage (green or purple, or a mix)
- 1 medium carrot, julienned or shredded
- 1/4 cup mayonnaise
- 2 tablespoons sweet chili sauce (store-bought or homemade)
- 1 tablespoon lime juice
- Fresh cilantro leaves (optional, for garnish)
- Thinly sliced cucumber or pickled jalapeños (optional, for extra crunch and kick)
Substitution tip: If you don’t have buttermilk or lemon juice on hand, plain yogurt thinned with a bit of milk works great for marinating the chicken. And if you want to keep it gluten-free, swap the all-purpose flour and cornstarch for a gluten-free flour blend with similar properties.
Instructions
- In a medium bowl, combine the buttermilk, garlic powder, onion powder, paprika, salt, and pepper. Add the chicken thighs and make sure they’re fully submerged. Cover and refrigerate for at least 1 hour, or up to overnight. This marinade tenderizes the chicken and infuses it with flavor—something my dad’s slow-simmered lentils always reminded me of: patience pays off.
- While the chicken marinates, prepare the slaw. In a small bowl, mix shredded cabbage, carrot, mayonnaise, sweet chili sauce, and lime juice. Stir until everything is coated and set aside in the fridge. The slaw brings a fresh crunch and coolness that balances the heat—just like my mom’s magic with canned tomatoes and spices.
- In another bowl or shallow dish, whisk together the flour, cornstarch, and a pinch of salt. This flour mixture is key to getting that crispy coating that makes you smile with every bite.
- Heat the vegetable oil in a deep skillet or Dutch oven to 350°F (175°C). Use a thermometer if you have one—trust me, it makes a difference. The oil should be hot enough to sizzle but not smoke.
- Remove the chicken from the marinade, allowing excess buttermilk to drip off. Dredge each piece in the flour mixture, pressing gently so the coating sticks well. For extra crunch, you can double-dip by dipping back into the buttermilk and then flour again, but I usually keep it simple on busy nights.
- Carefully place the chicken pieces into the hot oil. Fry for about 5-7 minutes per side, or until golden brown and cooked through (internal temperature should reach 165°F or 74°C). Don’t overcrowd the pan; fry in batches if needed to keep the oil temperature steady.
- Transfer the fried chicken to a wire rack or paper towels to drain excess oil. This keeps the crust crisp instead of soggy—one of those little details I learned from trial and error (and many messy counters).
- Toast the sandwich buns lightly in a dry skillet or under the broiler for a minute or two. This adds a bit of warmth and crunch that’s just irresistible.
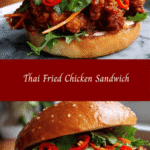
- Assemble your sandwich: spread a spoonful of the slaw on the bottom bun, add the fried chicken, top with extra cilantro or sliced cucumber if using, and finish with the top bun.
- Serve immediately and prepare for happy, messy faces around the table.
- Prep Time: 15 minutes
- Cook Time: 30 minutes
- Category: Main Dish
- Method: Cooking
- Cuisine: International
Keywords: Thai Fried Chicken Sandwich, recipe, cooking, food