Irresistible Cherry Pistachio Cheesecake Recipe You Need to Try
There’s something truly special about a Cherry Pistachio Cheesecake. It’s one of those desserts that feels like a celebration wrapped up in every bite—rich, creamy, and a little bit unexpected with those crunchy pistachios and bursts of tart cherry. As a mom who’s juggled the chaos of full-time work and toddler meltdowns, I cherish desserts that make my kitchen smell like comfort and love, without demanding all my time or sanity. This cheesecake is exactly that: a treat that feels fancy but is surprisingly approachable, perfect for those moments when you want to pause and enjoy something sweet with your family, even if the counters are still a mess from dinner.
Table of Contents
Why You’ll Love This Cherry Pistachio Cheesecake
Growing up, my dad’s kitchen was my favorite classroom. I remember standing on a wobbly chair, watching him stir pots while sharing stories. This Cherry Pistachio Cheesecake carries that same kind of warmth and storytelling—each ingredient brings its own memory or texture to the table. The creamy cheesecake layer is smooth and comforting, much like those late dinners in my childhood apartment. The pistachios add a satisfying crunch and a hint of nuttiness, while the cherries bring a pop of color and a gentle tartness that cuts through the richness.
This cheesecake isn’t about perfection; it’s about creating something that feels like a hug on a plate. I love how this recipe balances being fancy enough to impress guests but simple enough to whip up on a weekday evening without a million steps or mysterious ingredients. Plus, it’s a family favorite—my kids adore the cherries, and I appreciate that it keeps well, so there’s always a slice waiting in the fridge for me after bedtime chaos.
Ingredients You’ll Need for This Cherry Pistachio Cheesecake

- 1 ½ cups graham cracker crumbs (about 10 full sheets)
- ¼ cup granulated sugar
- 6 tablespoons unsalted butter, melted
- 24 ounces (3 packages) cream cheese, softened
- 1 cup granulated sugar
- 1 teaspoon vanilla extract
- 3 large eggs, at room temperature
- ½ cup sour cream
- 1 cup shelled pistachios, roughly chopped (plus extra for garnish)
- 1 ½ cups fresh or frozen cherries, pitted and halved
- 2 tablespoons cornstarch (optional, for cherry topping thickness)
- 2 tablespoons water (if making cherry topping)
- 1 tablespoon lemon juice (for cherry topping)
Substitution tips: If graham crackers aren’t your thing, digestive biscuits or even crushed vanilla wafers work great. You can swap sour cream for Greek yogurt if that’s what you have on hand, and if pistachios are tricky to find, toasted almonds make a lovely alternative. For the cherries, frozen works just fine—no need to thaw before adding them to the topping.
Nutrition Facts
- Calories: Approximately 420 per serving (based on 12 servings)
- Protein: 7g per serving
- Fat: 28g per serving
- Carbohydrates: 30g per serving
- Fiber: 2g per serving (thanks to the pistachios and cherries)
- Sugar: 22g per serving
- Sodium: 320mg per serving
Keep in mind, nutrition can vary depending on ingredient brands and portion sizes. But this cheesecake offers a nice balance of indulgence with some nutritional perks from the nuts and fruit. It’s the kind of dessert I feel good about sharing with my family, especially when balanced with a hearty dinner and a bit of movement during the day.
Print
Irresistible Cherry Pistachio Cheesecake Recipe You Need to Try
Learn how to make delicious Cherry Pistachio Cheesecake. Easy recipe with step-by-step instructions.
- Total Time: 45 minutes
- Yield: 4 servings 1x
Ingredients
- 1 ½ cups graham cracker crumbs (about 10 full sheets)
- ¼ cup granulated sugar
- 6 tablespoons unsalted butter, melted
- 24 ounces (3 packages) cream cheese, softened
- 1 cup granulated sugar
- 1 teaspoon vanilla extract
- 3 large eggs, at room temperature
- ½ cup sour cream
- 1 cup shelled pistachios, roughly chopped (plus extra for garnish)
- 1 ½ cups fresh or frozen cherries, pitted and halved
- 2 tablespoons cornstarch (optional, for cherry topping thickness)
- 2 tablespoons water (if making cherry topping)
- 1 tablespoon lemon juice (for cherry topping)
Substitution tips: If graham crackers aren’t your thing, digestive biscuits or even crushed vanilla wafers work great. You can swap sour cream for Greek yogurt if that’s what you have on hand, and if pistachios are tricky to find, toasted almonds make a lovely alternative. For the cherries, frozen works just fine—no need to thaw before adding them to the topping.
Instructions
- Preheat your oven to 325°F (160°C). Lightly grease a 9-inch springform pan and wrap the outside with aluminum foil to prevent leaks.
- In a medium bowl, mix the graham cracker crumbs, ¼ cup sugar, and melted butter until well combined and sandy in texture. Press this mixture firmly into the bottom of the springform pan to form the crust. Use the bottom of a glass or measuring cup to pack it down evenly. Set aside.
- In a large bowl, beat the softened cream cheese with an electric mixer on medium speed until smooth and creamy, about 2-3 minutes. This is key for that silky texture—no lumps allowed!
- Add 1 cup sugar and vanilla extract, and continue beating until combined.
- Add eggs one at a time, mixing just until incorporated after each addition. Avoid overmixing here; you don’t want too much air in the batter.
- Mix in the sour cream until just combined. Gently fold in the chopped pistachios using a spatula—this adds a lovely texture you’ll notice in every bite.
- Pour the cheesecake batter over the crust in the springform pan, smoothing the top with a spatula.
- Bake for 55-65 minutes, or until the edges are set but the center jiggles slightly when you gently shake the pan. The jiggle means it’s perfectly creamy inside, not undercooked or dry.
- While the cheesecake is baking, prepare the cherry topping: In a small saucepan over medium heat, combine cherries, cornstarch, water, and lemon juice. Stir constantly until the mixture thickens and becomes glossy, about 5 minutes. Remove from heat and cool.
- Once the cheesecake finishes baking, turn off the oven and leave the cheesecake inside with the door slightly open for 1 hour. This helps prevent cracks.
- Remove from oven and chill the cheesecake in the refrigerator for at least 4 hours, preferably overnight.
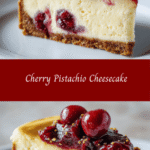
- Before serving, spread the cherry topping evenly over the cheesecake and sprinkle extra chopped pistachios on top for garnish.
One little trick I learned from my mom’s kitchen magic is to resist the urge to rush the cooling process. Patience here saves you from cracks or a soggy crust. Trust me, I’ve learned that the hard way more than once!
- Prep Time: 15 minutes
- Cook Time: 30 minutes
- Category: Main Dish
- Method: Cooking
- Cuisine: International
Keywords: Cherry Pistachio Cheesecake, recipe, cooking, food
Steps to Create Your Cherry Pistachio Cheesecake
- Preheat your oven to 325°F (160°C). Lightly grease a 9-inch springform pan and wrap the outside with aluminum foil to prevent leaks.
- In a medium bowl, mix the graham cracker crumbs, ¼ cup sugar, and melted butter until well combined and sandy in texture. Press this mixture firmly into the bottom of the springform pan to form the crust. Use the bottom of a glass or measuring cup to pack it down evenly. Set aside.
- In a large bowl, beat the softened cream cheese with an electric mixer on medium speed until smooth and creamy, about 2-3 minutes. This is key for that silky texture—no lumps allowed!
- Add 1 cup sugar and vanilla extract, and continue beating until combined.
- Add eggs one at a time, mixing just until incorporated after each addition. Avoid overmixing here; you don’t want too much air in the batter.
- Mix in the sour cream until just combined. Gently fold in the chopped pistachios using a spatula—this adds a lovely texture you’ll notice in every bite.
- Pour the cheesecake batter over the crust in the springform pan, smoothing the top with a spatula.
- Bake for 55-65 minutes, or until the edges are set but the center jiggles slightly when you gently shake the pan. The jiggle means it’s perfectly creamy inside, not undercooked or dry.
- While the cheesecake is baking, prepare the cherry topping: In a small saucepan over medium heat, combine cherries, cornstarch, water, and lemon juice. Stir constantly until the mixture thickens and becomes glossy, about 5 minutes. Remove from heat and cool.
- Once the cheesecake finishes baking, turn off the oven and leave the cheesecake inside with the door slightly open for 1 hour. This helps prevent cracks.
- Remove from oven and chill the cheesecake in the refrigerator for at least 4 hours, preferably overnight.
- Before serving, spread the cherry topping evenly over the cheesecake and sprinkle extra chopped pistachios on top for garnish.
One little trick I learned from my mom’s kitchen magic is to resist the urge to rush the cooling process. Patience here saves you from cracks or a soggy crust. Trust me, I’ve learned that the hard way more than once! Learn more: Decadent Baileys Chocolate Cheesecake Trifle Recipe to Satisfy Your Sweet Tooth
Tips for Making the Best Cherry Pistachio Cheesecake
From my experience juggling two kids and a kitchen full of chaos, here are some tips to keep this cheesecake stress-free and delicious:
- Room temperature ingredients: Let your cream cheese and eggs sit out for about 30 minutes before mixing. This helps everything blend smoothly without lumps.
- Don’t overmix: Once the eggs go in, mix just until combined. Overmixing can add air bubbles, causing cracks later.
- Use a water bath if you can: If you have time, place the springform pan in a larger pan filled with hot water (about halfway up the sides) during baking. This keeps the cheesecake moist and crack-free.
- Chill well: Cheesecake needs time to set. Overnight in the fridge is best if you can swing it.
- Toast your pistachios: Quickly toasting them in a dry pan for 2-3 minutes before chopping intensifies their flavor and crunch.
- Keep it simple: If you’re short on time, you can skip the cherry topping and just toss fresh cherries on top with a sprinkle of pistachios.
Serving Suggestions and Pairings

This Cherry Pistachio Cheesecake shines on its own, but I love pairing it with a few simple extras that make dessert feel like an event, even on a Tuesday night.
- A dollop of lightly sweetened whipped cream or a scoop of vanilla bean ice cream adds a creamy contrast.
- A drizzle of dark chocolate sauce complements the nutty pistachios and tart cherries perfectly.
- Fresh mint leaves scattered on top bring a pop of color and a refreshing bite.
- Serve alongside a cup of strong coffee or a fruity tea to balance the richness.
One night, when my kids were finally asleep and the kitchen was quiet, I treated myself to a slice with a cup of black coffee. It felt like a little victory—a reminder that even in busy, messy life, there’s always room for a sweet, comforting moment.
Storage and Reheating Tips
Cheesecake is one dessert that actually gets better with time. Here’s how I keep it fresh and tasty:
- Refrigerate: Store leftovers covered tightly with plastic wrap or in an airtight container for up to 5 days.
- Freeze: For longer storage, freeze the cheesecake (without cherry topping) wrapped in plastic wrap and foil. Thaw overnight in the fridge before serving.
- Reheating: Cheesecake is best served chilled, but if you prefer it slightly warmer, let it sit at room temperature for 15-20 minutes before slicing.
One time, I accidentally left a slice out overnight. It was still delicious the next day—though I wouldn’t recommend making this a habit! The key is keeping it cool and covered to preserve that creamy texture and fresh flavor.
Frequently Asked Questions
What are the main ingredients for Cherry Pistachio Cheesecake?
The main ingredients for Cherry Pistachio Cheesecake include the items listed in our ingredients section above. Each ingredient plays a crucial role in achieving the perfect flavor and texture.
How long does it take to make Cherry Pistachio Cheesecake?
The total time to make Cherry Pistachio Cheesecake includes both preparation and cooking time. Check the recipe card above for exact timing details.
Can I make Cherry Pistachio Cheesecake ahead of time?
Yes, Cherry Pistachio Cheesecake can often be prepared in advance. Store it properly in an airtight container in the refrigerator and consume within the recommended timeframe.
What can I serve with Cherry Pistachio Cheesecake?
Cherry Pistachio Cheesecake pairs well with various sides and accompaniments. Consider the serving suggestions mentioned in the recipe for the best dining experience.
Is Cherry Pistachio Cheesecake suitable for special diets?
Depending on the ingredients used, Cherry Pistachio Cheesecake may be adapted for various dietary needs. Check the ingredients list and consider substitutions as needed for your dietary requirements.
Final Thoughts
Making this Cherry Pistachio Cheesecake reminds me why I left the office life behind to embrace the messy, joyful chaos of home cooking. It’s not about fancy techniques or perfect presentations; it’s about creating something that fills your kitchen with warmth and your family’s bellies with happiness. This cheesecake is a little story on a plate—of late-night kitchen memories, of simple ingredients turned magical, and of love baked into every bite.
If you’re looking for a dessert that’s comforting but special, familiar but a little unexpected, this recipe is your new go-to. Whether it’s a weekend treat or a last-minute celebration, it’s a reminder that the best meals come from the heart, the kitchen counter’s mess, and the joy of sharing with those you love.