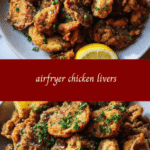
Crispy and Delicious: Elevate Your Dinner with Airfryer Chicken Livers
Hey there, fellow food lovers! If you’re anything like me, you’re always on the lookout for recipes that are both simple and packed with flavor. Today, I’m diving into the world of “airfryer chicken livers,” a dish that perfectly encapsulates my love for easy, homestyle cooking. Growing up, my dad often made chicken livers as a special treat, and though the thought of cooking them seemed intimidating at first, the air fryer has transformed this once daunting task into something delightfully simple. So, let’s embark on this culinary adventure together, embracing the joy of messy counters and full plates.
Table of Contents
Why You’ll Love This Airfryer Chicken Livers
First things first—why should you give airfryer chicken livers a try? Well, for starters, they’re quick and easy, making them perfect for busy weeknights. As a mom juggling the chaos of daily life, I’m always on the hunt for meals that won’t have me tied to the kitchen for hours. The air fryer speeds things up without compromising on flavor or texture. Plus, these chicken livers are packed with nutrients and have a crispy exterior that even my picky eaters can’t resist. It’s like a little nod to my childhood, standing beside my dad, watching the magic unfold in the kitchen.
Ingredients You’ll Need for This Airfryer Chicken Livers

Creating this dish doesn’t require a pantry full of exotic ingredients. Here’s what you’ll need:
- 1 pound chicken livers, cleaned and trimmed
- 1 cup all-purpose flour
- 1 teaspoon salt
- 1/2 teaspoon black pepper
- 1 teaspoon paprika
- 1/2 teaspoon garlic powder
- 2 eggs, beaten
- 1 cup breadcrumbs (panko works great for extra crunch)
- Cooking spray
If you’re missing something in the spice department, don’t stress. My mom was the queen of substitutions and always encouraged a little kitchen improvisation. Try using what you have on hand and make it your own!
Nutrition Facts
This recipe is not only tasty but also nutritious. Here’s what you can expect per serving: Learn more: Savor the Crunch: Discover the Secret to Delicious Crispy Chicken Taquitos
- Calories: 250 per serving
- Protein: 20g
- Fat: 12g
- Carbohydrates: 18g
- Fiber: 1g
- Sugar: 1g
- Sodium: 500mg

Crispy and Delicious: Elevate Your Dinner with Airfryer Chicken Livers
Learn how to make delicious airfryer chicken livers. Easy recipe with step-by-step instructions.
- Total Time: 45 minutes
- Yield: 4 servings 1x
Ingredients
Creating this dish doesn’t require a pantry full of exotic ingredients. Here’s what you’ll need:
- 1 pound chicken livers, cleaned and trimmed
- 1 cup all-purpose flour
- 1 teaspoon salt
- 1/2 teaspoon black pepper
- 1 teaspoon paprika
- 1/2 teaspoon garlic powder
- 2 eggs, beaten
- 1 cup breadcrumbs (panko works great for extra crunch)
- Cooking spray
If you’re missing something in the spice department, don’t stress. My mom was the queen of substitutions and always encouraged a little kitchen improvisation. Try using what you have on hand and make it your own!
Instructions
Follow these steps to create a dish that’ll have your family asking for seconds (or thirds):
- Preheat your air fryer to 400°F. This ensures that the livers cook evenly and achieve that perfect crispy texture.
- In a shallow bowl, combine the flour, salt, pepper, paprika, and garlic powder.
- Dip each chicken liver into the flour mixture, then into the beaten eggs, and finally coat with breadcrumbs. My kids love helping with this step, and it reminds me of how I used to help my mom with breading!
- Place the coated livers in a single layer in the air fryer basket. Make sure not to overcrowd them, or they won’t crisp up as nicely.
- Lightly spray the livers with cooking spray to help them brown and crisp.
- Cook for 10-12 minutes, flipping halfway through, until golden brown and cooked through.
- Prep Time: 15 minutes
- Cook Time: 30 minutes
- Category: Main Dish
- Method: Cooking
- Cuisine: International
Keywords: airfryer chicken livers, recipe, cooking, food
Steps to Create Your Airfryer Chicken Livers
Follow these steps to create a dish that’ll have your family asking for seconds (or thirds):
- Preheat your air fryer to 400°F. This ensures that the livers cook evenly and achieve that perfect crispy texture.
- In a shallow bowl, combine the flour, salt, pepper, paprika, and garlic powder.
- Dip each chicken liver into the flour mixture, then into the beaten eggs, and finally coat with breadcrumbs. My kids love helping with this step, and it reminds me of how I used to help my mom with breading!
- Place the coated livers in a single layer in the air fryer basket. Make sure not to overcrowd them, or they won’t crisp up as nicely.
- Lightly spray the livers with cooking spray to help them brown and crisp.
- Cook for 10-12 minutes, flipping halfway through, until golden brown and cooked through.
Tips for Making the Best Airfryer Chicken Livers
“Home cooking isn’t about perfection. It’s about feeding your people with love—one imperfect meal at a time.”
Here are some tips to ensure your airfryer chicken livers come out just right:
- Make sure to dry the livers thoroughly before coating; this helps the breading stick better.
- If you prefer a spicier kick, add a pinch of cayenne pepper to the flour mixture.
- Don’t skip the cooking spray step; it really helps achieve that crispy exterior.
Serving Suggestions and Pairings

These airfryer chicken livers are versatile and can be served in a variety of ways. Here are a few ideas:
- Serve them with a side of creamy mashed potatoes and a fresh green salad for a balanced meal.
- Pair with a tangy dipping sauce like honey mustard or a spicy sriracha mayo.
- For a lighter option, enjoy them on a bed of mixed greens with a vinaigrette dressing.
Storage and Reheating Tips
Got leftovers? No problem! Here’s how to store and reheat them:
- Store any leftover chicken livers in an airtight container in the refrigerator for up to 3 days.
- To reheat, pop them back in the air fryer at 350°F for 3-5 minutes until heated through. This keeps them crispy, unlike microwaving, which can make them soggy.
Frequently Asked Questions
What are the main ingredients for airfryer chicken livers?
The main ingredients for airfryer chicken livers include the items listed in our ingredients section above. Each ingredient plays a crucial role in achieving the perfect flavor and texture.
How long does it take to make airfryer chicken livers?
The total time to make airfryer chicken livers includes both preparation and cooking time. Check the recipe card above for exact timing details.
Can I make airfryer chicken livers ahead of time?
Yes, airfryer chicken livers can often be prepared in advance. Store it properly in an airtight container in the refrigerator and consume within the recommended timeframe.
What can I serve with airfryer chicken livers?
airfryer chicken livers pairs well with various sides and accompaniments. Consider the serving suggestions mentioned in the recipe for the best dining experience.
Is airfryer chicken livers suitable for special diets?
Depending on the ingredients used, airfryer chicken livers may be adapted for various dietary needs. Check the ingredients list and consider substitutions as needed for your dietary requirements.
Final Thoughts
There you have it, folks—airfryer chicken livers that are both easy to make and utterly delicious. This dish is a testament to the idea that great food doesn’t need to be complicated. It’s about bringing people together over a shared love of good, honest cooking. I hope this recipe becomes a staple in your home, just as it has in mine. Remember, the best meals are made with love and a little bit of laughter. Happy cooking!