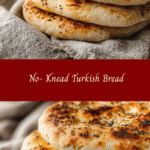
Easy No-Knead Turkish Bread Recipe for Perfectly Crispy Crusts
When life gets hectic—as it often does in my house with two little whirlwinds and a million things on my to-do list—I crave meals that feel homemade but don’t require hours of hands-on work. That’s why I fell in love with this No-Knead Turkish Bread. It’s one of those recipes that feels like a warm hug from the kitchen: simple, comforting, and surprisingly impressive without a ton of effort. Growing up, I wasn’t raised in a professional kitchen, but in a cozy apartment where dinner was always a lively event full of stories and love. This bread recipe brings me back to those moments, standing on a wobbly chair next to my dad, watching big pots bubble while dreaming of fresh bread to scoop up every last bit of stew. Whether you’re an experienced home cook or a tired parent like me, this bread will quickly become a staple in your routine.
Table of Contents
Why You’ll Love This No-Knead Turkish Bread
This No-Knead Turkish Bread is a game-changer for anyone who wants fresh, homemade bread without the fuss of traditional kneading and rising times. I remember the early days of trying to bake bread while juggling work emails and toddler tantrums—kneading was the last thing I had time or energy for. This recipe is forgiving, straightforward, and yields a crusty, flavorful loaf that feels like it took way more effort than it actually did.
What really makes this bread special is its rustic, chewy texture with a golden crust that’s perfect for soaking up soups, stews, or just slathering with butter. It’s also incredibly adaptable if you want to sneak in whole wheat or other flours. Plus, it’s made with pantry staples, so no last-minute grocery runs required. If you love the smell of fresh bread but hate complicated recipes, this is the one to bookmark.
From my own experience, this bread has become my go-to when I’m short on time but still want to gather my family around the table with something warm and satisfying. The kids love tearing it apart while it’s still warm, and my husband claims it’s better than anything from the bakery. That’s a win in my book!
Ingredients You’ll Need for This No-Knead Turkish Bread

- 3 cups all-purpose flour (or substitute 1 cup with whole wheat flour for a nuttier flavor)
- 1 1/2 teaspoons salt
- 1 teaspoon instant yeast
- 1 1/4 cups warm water (around 100°F/38°C)
- 2 tablespoons olive oil (optional, for a softer crust and richer flavor)
If you’re out of instant yeast, active dry yeast works fine—just activate it in the warm water first with a pinch of sugar. And if you want to get creative, a sprinkle of za’atar or nigella seeds on top before baking adds a lovely Turkish touch without complicating the process.
Nutrition Facts
- Calories: Approximately 180 per 1/8 loaf serving
- Protein: 5g
- Fat: 3g (mostly from olive oil, if used)
- Carbohydrates: 33g
- Fiber: 2g (higher if you use whole wheat flour)
- Sugar: 0.5g
- Sodium: 350mg
Keep in mind, these values are approximate and based on dividing the bread into eight slices. The beauty of homemade bread is knowing exactly what goes in, no hidden preservatives or weird additives—just honest ingredients you can trust. Learn more: Unlock Vibrant Flavors with Perfectly Sauteed Vegetables
Print
Easy No-Knead Turkish Bread Recipe for Perfectly Crispy Crusts
Learn how to make delicious No- Knead Turkish Bread. Easy recipe with step-by-step instructions.
- Total Time: 45 minutes
- Yield: 4 servings 1x
Ingredients
- 3 cups all-purpose flour (or substitute 1 cup with whole wheat flour for a nuttier flavor)
- 1 1/2 teaspoons salt
- 1 teaspoon instant yeast
- 1 1/4 cups warm water (around 100°F/38°C)
- 2 tablespoons olive oil (optional, for a softer crust and richer flavor)
If you’re out of instant yeast, active dry yeast works fine—just activate it in the warm water first with a pinch of sugar. And if you want to get creative, a sprinkle of za’atar or nigella seeds on top before baking adds a lovely Turkish touch without complicating the process.
Instructions
- In a large mixing bowl, combine the flour, salt, and instant yeast. If you’re using whole wheat flour, mix it in here as well. I like to whisk these dry ingredients together first to make sure everything is evenly distributed.
- Add the warm water and olive oil (if using) to the dry ingredients. Using a wooden spoon or your hand, mix until a shaggy, sticky dough forms. Don’t worry if it looks messy—that’s exactly what you want!
- Cover the bowl tightly with plastic wrap or a clean kitchen towel. Leave it on the counter to rise for 12 to 18 hours. I usually start this in the evening and bake the next day, which fits perfectly into my busy schedule.
- After the dough has risen and looks bubbly and expanded, generously flour a clean surface. Turn the dough out gently and fold it over on itself a couple of times to shape it into a rough ball. Resist the urge to knead—it’s no-knead after all!
- Place the dough seam-side down on a piece of parchment paper. Cover with a kitchen towel and let it rest for about 30 minutes while you preheat your oven to 450°F (230°C). Place a heavy, lidded Dutch oven or oven-safe pot inside the oven during preheating.
- Carefully remove the hot Dutch oven from the oven. Using the parchment paper, lift the dough ball and place it inside. Cover with the lid and bake for 30 minutes.
- After 30 minutes, remove the lid and bake for an additional 10-15 minutes until the bread is golden brown and crusty. If you like a darker crust, you can leave it in a few minutes longer, but keep an eye on it to avoid burning.
- Remove the bread from the oven and transfer it to a wire rack to cool for at least 20 minutes before slicing. I know it’s tempting to cut in right away, but trust me—letting it rest keeps the crumb from getting gummy.
I remember the first time I tried this method—no kneading, just a long slow rise—and honestly, I was skeptical. But the result was a crusty, airy bread that made my kitchen smell like a bakery and my family smile from ear to ear. And the best part? No flour on the floor from frantic kneading or wrists begging for mercy.
- Prep Time: 15 minutes
- Cook Time: 30 minutes
- Category: Main Dish
- Method: Cooking
- Cuisine: International
Keywords: No- Knead Turkish Bread, recipe, cooking, food
Steps to Create Your No-Knead Turkish Bread
- In a large mixing bowl, combine the flour, salt, and instant yeast. If you’re using whole wheat flour, mix it in here as well. I like to whisk these dry ingredients together first to make sure everything is evenly distributed.
- Add the warm water and olive oil (if using) to the dry ingredients. Using a wooden spoon or your hand, mix until a shaggy, sticky dough forms. Don’t worry if it looks messy—that’s exactly what you want!
- Cover the bowl tightly with plastic wrap or a clean kitchen towel. Leave it on the counter to rise for 12 to 18 hours. I usually start this in the evening and bake the next day, which fits perfectly into my busy schedule.
- After the dough has risen and looks bubbly and expanded, generously flour a clean surface. Turn the dough out gently and fold it over on itself a couple of times to shape it into a rough ball. Resist the urge to knead—it’s no-knead after all!
- Place the dough seam-side down on a piece of parchment paper. Cover with a kitchen towel and let it rest for about 30 minutes while you preheat your oven to 450°F (230°C). Place a heavy, lidded Dutch oven or oven-safe pot inside the oven during preheating.
- Carefully remove the hot Dutch oven from the oven. Using the parchment paper, lift the dough ball and place it inside. Cover with the lid and bake for 30 minutes.
- After 30 minutes, remove the lid and bake for an additional 10-15 minutes until the bread is golden brown and crusty. If you like a darker crust, you can leave it in a few minutes longer, but keep an eye on it to avoid burning.
- Remove the bread from the oven and transfer it to a wire rack to cool for at least 20 minutes before slicing. I know it’s tempting to cut in right away, but trust me—letting it rest keeps the crumb from getting gummy.
I remember the first time I tried this method—no kneading, just a long slow rise—and honestly, I was skeptical. But the result was a crusty, airy bread that made my kitchen smell like a bakery and my family smile from ear to ear. And the best part? No flour on the floor from frantic kneading or wrists begging for mercy.
Tips for Making the Best No-Knead Turkish Bread
- Use warm water: Yeast loves warmth but hates heat, so aim for water that’s warm to the touch but not hot. This helps the yeast wake up and get busy.
- Don’t rush the rise: The long fermentation time is what develops flavor and texture. If you’re tight on time, you can shorten it to about 8 hours, but the bread won’t be quite as flavorful.
- Flour your hands and surface liberally: Sticky dough can be frustrating, but a little extra flour goes a long way to making handling easier without drying out the dough.
- Use a Dutch oven or heavy pot with a lid: This traps steam and creates that signature crisp crust. If you don’t have one, try baking the bread on a preheated baking stone with a pan of water in the oven to create steam.
- Experiment with toppings: Sprinkle sesame seeds, nigella seeds, or za’atar before baking to add a Turkish flair and extra flavor.
“Cooking isn’t about perfection. It’s about messy counters, full plates, and feeding your people with love—one imperfect meal at a time.” This bread embodies that philosophy perfectly.
Serving Suggestions and Pairings

This No-Knead Turkish Bread is incredibly versatile. When my kids were younger, they loved tearing chunks off and dipping into olive oil and za’atar, making snack time feel like a little celebration. It’s also fantastic alongside soups and stews, perfect for sopping up every last bit of sauce.
Here are a few of my favorite ways to enjoy it:
- Serve warm with a drizzle of good olive oil and a sprinkle of sea salt for a simple, delicious starter.
- Slice and toast for sandwiches—this bread holds up beautifully without getting soggy.
- Use it as a side for hearty Turkish dishes like lentil soup or shakshuka.
- Turn leftover bread into croutons by cubing, tossing with olive oil and your favorite herbs, then baking until crispy.
Each time I serve this bread, it sparks a little joy around my family table, reminding me of those early kitchen moments with my parents where food was a language of love and connection.
Storage and Reheating Tips
Because this bread is best fresh, I usually bake it the day I plan to serve it. But, if you have leftovers, here’s what I do:
- Let the bread cool completely before storing to prevent sogginess.
- Wrap it tightly in plastic wrap or place it in a resealable plastic bag, then store at room temperature for up to 2 days.
- For longer storage, slice and freeze the bread. You can toast slices directly from the freezer for a quick refresh.
- To reheat a whole loaf, sprinkle with a little water, wrap in foil, and warm in a 350°F (175°C) oven for 10-15 minutes to bring back that fresh-baked aroma and crust.
I’ve learned the hard way that bread left out uncovered gets stale fast, but a quick toast or oven warm-up brings it right back to life, perfect for busy weeknights or last-minute guests.
Frequently Asked Questions
What are the main ingredients for No- Knead Turkish Bread?
The main ingredients for No- Knead Turkish Bread include the items listed in our ingredients section above. Each ingredient plays a crucial role in achieving the perfect flavor and texture.
How long does it take to make No- Knead Turkish Bread?
The total time to make No- Knead Turkish Bread includes both preparation and cooking time. Check the recipe card above for exact timing details.
Can I make No- Knead Turkish Bread ahead of time?
Yes, No- Knead Turkish Bread can often be prepared in advance. Store it properly in an airtight container in the refrigerator and consume within the recommended timeframe.
What can I serve with No- Knead Turkish Bread?
No- Knead Turkish Bread pairs well with various sides and accompaniments. Consider the serving suggestions mentioned in the recipe for the best dining experience.
Is No- Knead Turkish Bread suitable for special diets?
Depending on the ingredients used, No- Knead Turkish Bread may be adapted for various dietary needs. Check the ingredients list and consider substitutions as needed for your dietary requirements.
Final Thoughts
This No-Knead Turkish Bread has become one of those recipes I turn to when life is buzzing around me, and I want to create something real, warm, and comforting without adding stress. It’s a reminder that good food doesn’t have to be complicated—it just needs love, patience, and a bit of flour on your hands.
From my small, lively apartment kitchen to yours, I hope this bread brings a little extra warmth and connection to your table. Whether you’re feeding hungry kids, impressing friends, or just craving that perfect slice with butter, this recipe has your back. And if you ever feel overwhelmed in the kitchen, remember: it’s not about perfection. It’s about the joy in the process and the people who get to share the meal.