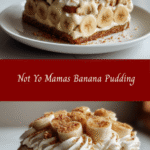
Not Yo Mamas Banana Pudding A Bold Twist on a Classic Dessert
There’s something about banana pudding that instantly whisks me back to my childhood kitchen—late dinners, loud laughter, and the warm hum of my dad’s stories as he stirred his giant pots. But let me tell you, this isn’t your mama’s banana pudding. Nope, this is Not Yo Mamas Banana Pudding, a twist on the classic that’s creamy, dreamy, and just a little bit unexpected. As a mom who’s juggled full-time work and two little whirlwinds, I’m all about making desserts that feel special but don’t require a full day in the kitchen. This recipe is comfort food with a kick, made for real life, messy counters, and hungry bellies.
Table of Contents
Why You’ll Love This Not Yo Mamas Banana Pudding
When I first started cooking seriously at home, I craved recipes that were straightforward but still tasted like they belonged in a fancy restaurant. Not Yo Mamas Banana Pudding hits that sweet spot. It’s easy enough for weeknight dessert emergencies but rich enough to impress your in-laws (or just your very picky kids). What makes it stand out from the usual banana pudding? It’s the layers of texture—a little crunch, a little silkiness, and a touch of something unexpected that keeps everyone coming back for more.
This pudding also carries a bit of my kitchen philosophy: food is about love, not perfection. Growing up, my mom could transform a can of tomatoes and a few spices into magic, and I try to channel that same spirit here. The ingredients are simple, the steps are manageable, and the outcome is pure joy. Plus, it’s a great way to sneak a little extra fruit into dessert—which, honestly, feels like a win when you’re feeding a family.
Ingredients You’ll Need for This Not Yo Mamas Banana Pudding

- 4 ripe bananas, sliced thinly
- 1 cup heavy cream
- 1 (14 oz) can sweetened condensed milk
- 1 ½ cups whole milk
- 1 package (3.4 oz) instant vanilla pudding mix
- 1 teaspoon vanilla extract
- 1 box vanilla wafer cookies (about 11 oz)
- Optional: ½ cup chopped pecans or toasted coconut for extra crunch
- Pinch of salt
If you don’t have heavy cream, you can substitute with full-fat coconut milk for a dairy-free twist. I also like to swap out the vanilla wafers for graham crackers occasionally, especially when I’m out of the usual cookies. It gives a slightly different texture but keeps the spirit of the pudding alive.
Nutrition Facts
- Calories: Approximately 350 per serving (based on 8 servings)
- Protein: 5g
- Fat: 15g
- Carbohydrates: 50g
- Fiber: 3g
- Sugar: 35g (naturally occurring and added)
- Sodium: 150mg
These numbers are a rough guide based on typical ingredient brands and portion sizes. I always remind my family (and myself) that desserts are for celebration and enjoyment. Balance is key, but sometimes you just need that creamy, nostalgic scoop of banana pudding.
Print
Not Yo Mamas Banana Pudding A Bold Twist on a Classic Dessert
Learn how to make delicious Not Yo Mamas Banana Pudding. Easy recipe with step-by-step instructions.
- Total Time: 45 minutes
- Yield: 4 servings 1x
Ingredients
- 4 ripe bananas, sliced thinly
- 1 cup heavy cream
- 1 (14 oz) can sweetened condensed milk
- 1 ½ cups whole milk
- 1 package (3.4 oz) instant vanilla pudding mix
- 1 teaspoon vanilla extract
- 1 box vanilla wafer cookies (about 11 oz)
- Optional: ½ cup chopped pecans or toasted coconut for extra crunch
- Pinch of salt
If you don’t have heavy cream, you can substitute with full-fat coconut milk for a dairy-free twist. I also like to swap out the vanilla wafers for graham crackers occasionally, especially when I’m out of the usual cookies. It gives a slightly different texture but keeps the spirit of the pudding alive.
Instructions
- Start by slicing your bananas thinly. I like to do this right before layering to keep them fresh and prevent browning.
- In a large mixing bowl, whisk together the sweetened condensed milk, whole milk, and instant vanilla pudding mix until it thickens—about 2 minutes. It should be smooth and slightly firm.
- In a separate bowl, whip the heavy cream with a pinch of salt and vanilla extract until soft peaks form. This usually takes me around 3-4 minutes with a hand mixer.
- Gently fold the whipped cream into the pudding mixture. This lightens the texture and makes the pudding feel luscious without being too heavy.
- Grab a large trifle dish or a deep glass bowl. Layer a third of the vanilla wafers at the bottom—don’t be shy, these cookies soak up the pudding and get wonderfully soft.
- Add a layer of sliced bananas over the wafers.
- Pour and spread a third of the pudding mixture over the bananas and wafers.
- Repeat the layers two more times, ending with a final pudding layer on top.
- If you’re feeling fancy (or just want a little extra crunch), sprinkle chopped pecans or toasted coconut on top.
- Cover with plastic wrap and refrigerate for at least 4 hours, but overnight is best. This resting time allows the flavors to meld and the wafers to soften perfectly.
One thing I’ve learned from my dad’s slow-cooked lentils and rice is patience. The longer you let the pudding sit, the better it tastes. I remember waiting with my kids (and a lot of finger-licking) for the pudding to be just right. It’s worth the wait.
- Prep Time: 15 minutes
- Cook Time: 30 minutes
- Category: Main Dish
- Method: Cooking
- Cuisine: International
Keywords: Not Yo Mamas Banana Pudding, recipe, cooking, food
Steps to Create Your Not Yo Mamas Banana Pudding
- Start by slicing your bananas thinly. I like to do this right before layering to keep them fresh and prevent browning.
- In a large mixing bowl, whisk together the sweetened condensed milk, whole milk, and instant vanilla pudding mix until it thickens—about 2 minutes. It should be smooth and slightly firm.
- In a separate bowl, whip the heavy cream with a pinch of salt and vanilla extract until soft peaks form. This usually takes me around 3-4 minutes with a hand mixer.
- Gently fold the whipped cream into the pudding mixture. This lightens the texture and makes the pudding feel luscious without being too heavy.
- Grab a large trifle dish or a deep glass bowl. Layer a third of the vanilla wafers at the bottom—don’t be shy, these cookies soak up the pudding and get wonderfully soft.
- Add a layer of sliced bananas over the wafers.
- Pour and spread a third of the pudding mixture over the bananas and wafers.
- Repeat the layers two more times, ending with a final pudding layer on top.
- If you’re feeling fancy (or just want a little extra crunch), sprinkle chopped pecans or toasted coconut on top.
- Cover with plastic wrap and refrigerate for at least 4 hours, but overnight is best. This resting time allows the flavors to meld and the wafers to soften perfectly.
One thing I’ve learned from my dad’s slow-cooked lentils and rice is patience. The longer you let the pudding sit, the better it tastes. I remember waiting with my kids (and a lot of finger-licking) for the pudding to be just right. It’s worth the wait. Learn more: Peach Cobbler Pound Cake: A Sweet Southern Twist
Tips for Making the Best Not Yo Mamas Banana Pudding
Here’s where I get a little personal because I’ve made my share of banana puddings that were either too runny or too stiff. The secret? Balance and timing.
- Use ripe but firm bananas: Overripe bananas can turn mushy and make your pudding overly sweet and soggy. I like bananas that have a little give but still hold their shape.
- Don’t skip the whipped cream: It makes the texture lighter and more luxurious. Trust me, my mom’s magic with simple ingredients inspires me to never overlook this step.
- Layer strategically: Make sure your wafers are evenly spread for the best soak and texture contrast. I usually press them down lightly to help them absorb the pudding better.
- Chill, chill, chill: This dessert needs time to set. I learned the hard way in a busy weeknight rush that patience is key here. It’s worth prepping it the night before to save stress.
- Customize your crunch: Mix up the topping with pecans, toasted coconut, or even a sprinkle of cinnamon. It adds a little personality that makes this pudding truly Not Yo Mamas.
Serving Suggestions and Pairings

This pudding is a star on its own, but I love how it plays with other flavors at the table. When my kids were little, we’d serve it with a tall glass of cold milk or a scoop of vanilla ice cream for those extra special days. Sometimes, I add fresh berries on the side to brighten things up, which also helps balance the sweetness.
If you’re bringing this to a potluck or family gathering, consider these pairings:
- A crisp, slightly tart fruit salad (think pineapple, kiwi, and strawberries)
- A light cup of black coffee or espresso to cut through the richness
- Simple whipped cream with a hint of bourbon or rum extract for grown-up flair
Personally, I find that this pudding shines brightest when served straight from the fridge, on a warm evening, while sharing stories with my family—just like those nights in my childhood apartment.
Storage and Reheating Tips
Banana pudding is best enjoyed fresh, but leftovers happen—especially in a busy household like mine. Here’s how to make the most of yours:
- Storage: Cover tightly with plastic wrap or an airtight lid and refrigerate. It will keep well for up to 3 days.
- Texture note: The wafers continue to soften over time, so if you prefer a bit of crunch, eat it within 24 hours.
- Reheating: This dessert is served cold, so no need to heat it. However, if you want to soften the bananas or wafers a little more, let the pudding sit at room temperature for 15-20 minutes before serving.
One thing I always remind myself is that leftovers are just another chance to enjoy a comfort food hug from the fridge. Sometimes, I scoop a bowl for a midnight snack when the house is quiet and the kids are asleep. It’s my little moment of calm in the chaos.
Frequently Asked Questions
What are the main ingredients for Not Yo Mamas Banana Pudding?
The main ingredients for Not Yo Mamas Banana Pudding include the items listed in our ingredients section above. Each ingredient plays a crucial role in achieving the perfect flavor and texture.
How long does it take to make Not Yo Mamas Banana Pudding?
The total time to make Not Yo Mamas Banana Pudding includes both preparation and cooking time. Check the recipe card above for exact timing details.
Can I make Not Yo Mamas Banana Pudding ahead of time?
Yes, Not Yo Mamas Banana Pudding can often be prepared in advance. Store it properly in an airtight container in the refrigerator and consume within the recommended timeframe.
What can I serve with Not Yo Mamas Banana Pudding?
Not Yo Mamas Banana Pudding pairs well with various sides and accompaniments. Consider the serving suggestions mentioned in the recipe for the best dining experience.
Is Not Yo Mamas Banana Pudding suitable for special diets?
Depending on the ingredients used, Not Yo Mamas Banana Pudding may be adapted for various dietary needs. Check the ingredients list and consider substitutions as needed for your dietary requirements.
Final Thoughts
Not Yo Mamas Banana Pudding is more than just a dessert; it’s a little slice of home, a nod to the messy, loud, love-filled kitchens where food brings us together. This recipe lives at the intersection of simplicity and indulgence—perfect for the mom who doesn’t have hours to bake but still wants to create something special. It’s the kind of pudding that makes you smile, lick the spoon, and maybe sneak an extra bite when no one’s looking.
“Home cooking isn’t about perfection. It’s about messy counters, full plates, and feeding your people with love—one imperfect meal at a time.”
So next time you’re craving something sweet and comforting, give this recipe a try. It’s banana pudding, but not like your mama made it—and sometimes, that’s exactly what you need.