Irresistible Pears with Blue Cheese and Walnuts Recipe for Gourmet Flavor
If you’d told me a few years ago that I’d be raving about Pears With Blue Cheese and Walnuts as one of my go-to snacks, I might have laughed. Growing up, my kitchen was a whirlwind of loud conversations, late dinners, and dishes that screamed comfort rather than fancy flavor combos. But this simple, elegant pairing has become a staple in my home—especially when I want something that feels a little special but doesn’t require a full-on cooking marathon. There’s something about the sweet juiciness of pears, the tangy punch of blue cheese, and the satisfying crunch of walnuts that hits all the right notes for me, especially when life is busy and messy. It’s the kind of dish I love sharing with my family or sneaking bites of while trying to convince my kids that, yes, this is delicious.
Table of Contents
Why You’ll Love This Pears With Blue Cheese and Walnuts
This recipe is a perfect example of what I mean when I say home cooking isn’t about perfection—it’s about flavor, ease, and feeding your people with love. Pears With Blue Cheese and Walnuts combines fresh, simple ingredients into a dish that feels both fancy and approachable. It’s incredibly easy to prepare, requires no complicated steps, and is versatile enough to serve as a snack, appetizer, or even a light lunch.
From my own experience, this dish often pops up when I need a quick bite between shuttling kids to activities or when unexpected guests drop by. The flavor contrast is what really sells it: the creamy, salty tang of blue cheese balances the natural sweetness of ripe pears, while walnuts add a deep, earthy crunch. It’s like a little party in your mouth that doesn’t involve a mess of pots and pans.
Plus, it’s a great way to introduce kids or picky eaters to bold flavors—my youngest was skeptical at first, but the crunchy walnuts and sweet pears won her over, and now she asks for it on the regular. If you’re someone who loves rustic, fuss-free recipes that feel a little indulgent, this one will quickly become one of your favorites.
Ingredients You’ll Need for This Pears With Blue Cheese and Walnuts

- 3 ripe but firm pears (Bartlett or Anjou work great)
- 4 ounces blue cheese (crumbled; Gorgonzola or Roquefort are good choices)
- 1 cup walnuts, roughly chopped
- 2 tablespoons honey (for drizzling)
- 1 tablespoon fresh lemon juice (to prevent pears from browning)
- Optional: Fresh thyme or rosemary sprigs for garnish
- Optional: A pinch of freshly ground black pepper
If you’re not a fan of blue cheese’s strong flavor, goat cheese makes a lovely milder substitute. For walnuts, toasted pecans or almonds can add a similar crunch and warmth. And if you don’t have honey on hand, a drizzle of maple syrup works just as well to bring out the pear’s natural sweetness.
Nutrition Facts
- Calories: Approximately 250 per serving (serves 4)
- Protein: 6 grams
- Fat: 18 grams (mostly from walnuts and cheese)
- Carbohydrates: 15 grams
- Fiber: 3 grams
- Sugar: 12 grams (naturally occurring and from honey)
- Sodium: 220 mg (mainly from blue cheese)
These figures are a rough estimate based on average ingredient values and typical serving sizes. It’s a dish that feels indulgent but also offers a decent dose of fiber and healthy fats, especially if you lean on walnuts and fresh fruit. I always think of it as a treat that also fuels you—a nice balance when you’re juggling the chaos of daily life.
Print
Irresistible Pears with Blue Cheese and Walnuts Recipe for Gourmet Flavor
Learn how to make delicious Pears With Blue Cheese and Walnuts. Easy recipe with step-by-step instructions.
- Total Time: 45 minutes
- Yield: 4 servings 1x
Ingredients
- 3 ripe but firm pears (Bartlett or Anjou work great)
- 4 ounces blue cheese (crumbled; Gorgonzola or Roquefort are good choices)
- 1 cup walnuts, roughly chopped
- 2 tablespoons honey (for drizzling)
- 1 tablespoon fresh lemon juice (to prevent pears from browning)
- Optional: Fresh thyme or rosemary sprigs for garnish
- Optional: A pinch of freshly ground black pepper
If you’re not a fan of blue cheese’s strong flavor, goat cheese makes a lovely milder substitute. For walnuts, toasted pecans or almonds can add a similar crunch and warmth. And if you don’t have honey on hand, a drizzle of maple syrup works just as well to bring out the pear’s natural sweetness.
Instructions
- Wash and dry your pears thoroughly. Slice each pear into thin wedges, about 1/4-inch thick, to make them easy to eat and pretty on the plate.
- Immediately toss the pear slices in a bowl with the fresh lemon juice. This little trick keeps them from turning brown and looking unappetizing while you prep everything else.
- Roughly chop the walnuts and, if you like, toast them in a dry skillet over medium heat for 3-4 minutes until fragrant. Toasting brings out their flavor and adds extra crunch—a step I don’t skip, even on busy days.
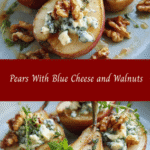
- Arrange the pear slices on a serving platter or individual plates. Sprinkle the crumbled blue cheese evenly over the pears.
- Scatter the toasted walnuts on top for that perfect crunch.
- Drizzle honey generously over the entire dish, letting it pool in little sweet pockets.
- Optional but highly recommended: garnish with fresh thyme or rosemary sprigs and add a pinch of freshly ground black pepper to elevate the flavors.
My advice? Don’t overthink this one. The beauty of Pears With Blue Cheese and Walnuts is in its simplicity. When I first started making this, I’d get hung up on “perfect” presentation, but honestly, a little messiness just adds to the charm. Plus, it’s the kind of dish where a few drips of honey on your counter mean you’re doing it right.
- Prep Time: 15 minutes
- Cook Time: 30 minutes
- Category: Main Dish
- Method: Cooking
- Cuisine: International
Keywords: Pears With Blue Cheese and Walnuts, recipe, cooking, food
Steps to Create Your Pears With Blue Cheese and Walnuts
- Wash and dry your pears thoroughly. Slice each pear into thin wedges, about 1/4-inch thick, to make them easy to eat and pretty on the plate.
- Immediately toss the pear slices in a bowl with the fresh lemon juice. This little trick keeps them from turning brown and looking unappetizing while you prep everything else.
- Roughly chop the walnuts and, if you like, toast them in a dry skillet over medium heat for 3-4 minutes until fragrant. Toasting brings out their flavor and adds extra crunch—a step I don’t skip, even on busy days.
- Arrange the pear slices on a serving platter or individual plates. Sprinkle the crumbled blue cheese evenly over the pears.
- Scatter the toasted walnuts on top for that perfect crunch.
- Drizzle honey generously over the entire dish, letting it pool in little sweet pockets.
- Optional but highly recommended: garnish with fresh thyme or rosemary sprigs and add a pinch of freshly ground black pepper to elevate the flavors.
My advice? Don’t overthink this one. The beauty of Pears With Blue Cheese and Walnuts is in its simplicity. When I first started making this, I’d get hung up on “perfect” presentation, but honestly, a little messiness just adds to the charm. Plus, it’s the kind of dish where a few drips of honey on your counter mean you’re doing it right. Learn more: Irresistible Brazilian Cheese Bread The Ultimate Cheesy Delight
Tips for Making the Best Pears With Blue Cheese and Walnuts
Over the years, I’ve learned a few tricks that make this dish shine, especially when life feels like a whirlwind and I’m juggling dinner prep with everything else:
- Choose pears that are ripe but firm. You want them juicy but not mushy, so they hold up well against the cheese and walnuts.
- Don’t skip the lemon juice. This simple step saves you from browning pears, which can make the dish look less fresh and appetizing.
- Toast the walnuts. It’s a small step that pays off big on flavor. I usually multitask and toast nuts while helping the kids with homework or prepping another part of dinner.
- Use good-quality blue cheese. Since it’s a star player here, investing in a flavorful but not overpowering variety makes a difference. When my kids were younger and skeptical, I started with milder Gorgonzola before moving to stronger Roquefort.
- Honey or maple syrup? Both work beautifully. I keep honey handy because it’s what I grew up with, but maple syrup gives a lovely depth if you want to switch things up.
- Play with herbs and spices. Fresh thyme, rosemary, or even a pinch of black pepper add layers of flavor without complicating the recipe.
Serving Suggestions and Pairings

This dish is wonderfully versatile and can fit into so many parts of your meal or day. I often serve Pears With Blue Cheese and Walnuts as a light appetizer when friends come over, paired with crusty bread or crackers. It also shines as part of a cheese board alongside cured meats, olives, and a glass of crisp white wine—perfect for those moments when you want to feel fancy but still keep it casual.
On busy weeknights, I sometimes toss the pears and walnuts over a simple green salad with mixed greens and a vinaigrette made from olive oil and balsamic vinegar. It’s a quick way to elevate a salad and get some fresh flavors on the table without extra fuss.
For a cozy twist, try serving this alongside roasted chicken or pork chops. The sweet and savory contrast complements the savory meat beautifully.
“Some of my best memories in the kitchen come from those nights when I threw together something simple like this, and my family ended up asking for seconds. It’s proof that you don’t need a fancy recipe to make a meal special.”
Storage and Reheating Tips
Because this dish relies on fresh pears and cheese, it’s best enjoyed soon after assembling. That said, if you want to prep ahead, here’s what I’ve found works:
- Keep the pear slices and lemon juice mixture in an airtight container in the fridge for up to 24 hours. Drain any excess liquid before assembling.
- Store walnuts separately in an airtight container to keep them crunchy. Toast them fresh if they lose their crunch.
- Blue cheese can be crumbled and stored in the fridge for a few days, but add it just before serving.
- Once assembled, it’s best to eat within a couple of hours. The pears will soften and the walnuts may lose some crunch if left too long.
- This dish isn’t meant for reheating, but if you want warm walnuts, quickly toast them in a skillet just before serving.
I’ve learned the hard way that trying to store the whole dish mixed together can make it soggy. So, if you’re prepping snacks for a party or meal prep, keep components separate and put them together at the last minute. It saves you from wasting those perfectly crisp pears and crunchy walnuts.
Frequently Asked Questions
What are the main ingredients for Pears With Blue Cheese and Walnuts?
The main ingredients for Pears With Blue Cheese and Walnuts include the items listed in our ingredients section above. Each ingredient plays a crucial role in achieving the perfect flavor and texture.
How long does it take to make Pears With Blue Cheese and Walnuts?
The total time to make Pears With Blue Cheese and Walnuts includes both preparation and cooking time. Check the recipe card above for exact timing details.
Can I make Pears With Blue Cheese and Walnuts ahead of time?
Yes, Pears With Blue Cheese and Walnuts can often be prepared in advance. Store it properly in an airtight container in the refrigerator and consume within the recommended timeframe.
What can I serve with Pears With Blue Cheese and Walnuts?
Pears With Blue Cheese and Walnuts pairs well with various sides and accompaniments. Consider the serving suggestions mentioned in the recipe for the best dining experience.
Is Pears With Blue Cheese and Walnuts suitable for special diets?
Depending on the ingredients used, Pears With Blue Cheese and Walnuts may be adapted for various dietary needs. Check the ingredients list and consider substitutions as needed for your dietary requirements.
Final Thoughts
At the heart of Pears With Blue Cheese and Walnuts is the kind of home cooking I love sharing here at HomeFoodieRecipes: simple, tasty, and full of heart. It’s a dish that reminds me of those early kitchen moments with my dad and mom—the joy found in mixing basic ingredients with care and a little bit of love. Whether you’re sneaking it between busy mom duties or serving it up for friends, it’s a recipe that welcomes you to the table without fuss or stress.
Every time I make this dish, I’m reminded that great food doesn’t need to be complicated. It just needs to be real, approachable, and shared with the people you love—messy counters and all. So the next time you have a pear lying around and a craving for something fresh yet indulgent, try this recipe. I promise, it’s a small joy that feels like a hug for your taste buds.