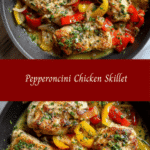
One-Pan Pepperoncini Chicken Skillet Recipe for Easy Flavor-Packed Dinners
There’s something about a Pepperoncini Chicken Skillet that just feels like a warm hug after a long day. I remember the first time I made this dish—it was during one of those chaotic weeks where the kids were bouncing off the walls, and my usually neat kitchen looked more like a tornado had hit it. Yet, this skillet came together quickly, with minimal fuss, and filled the house with a tangy, savory aroma that made everyone pause and smile. It reminded me of those late, loud dinners in my childhood apartment where food wasn’t about fancy presentation but about connection and comfort. This recipe is exactly that: simple, flavorful, and forgiving enough for busy home cooks like me and, hopefully, you too.
Table of Contents
Why You’ll Love This Pepperoncini Chicken Skillet
If you’re anything like me—a mom juggling a million things, craving meals that are fast, fuss-free, and family-approved—this Pepperoncini Chicken Skillet is about to become your new go-to. The magic lies in the tangy pepperoncini peppers and their brine, which infuse the chicken with a bright, zesty flavor without needing a long marinade or a dozen ingredients. It’s one-pan cooking at its finest, meaning less cleanup when the kids are ready to escape the table and less stress for you.
Plus, it’s a perfect reminder that home cooking doesn’t have to be complicated or perfect. When I first shared this dish with my family, my youngest declared it “the best chicken ever,” which, as any parent knows, is the highest praise you can get. It’s a little spicy, a little tangy, and totally comforting—all in one skillet. And honestly, that’s what cooking at home is all about: messy counters, big plates, and full hearts.
Ingredients You’ll Need for This Pepperoncini Chicken Skillet

- 4 boneless, skinless chicken thighs (you can use breasts if preferred, but thighs stay juicier)
- 1 jar (about 7 ounces) pepperoncini peppers with juice
- 2 tablespoons olive oil
- 3 cloves garlic, minced
- 1 teaspoon dried oregano
- 1 teaspoon dried basil
- 1/2 teaspoon crushed red pepper flakes (optional, for extra heat)
- Salt and freshly ground black pepper, to taste
- 1/2 cup chicken broth (or water as a quick substitute)
- 1/4 cup sliced green olives (optional, but adds a nice briny punch)
- Fresh parsley, chopped, for garnish
If you’re short on pepperoncini, mild banana peppers can work in a pinch, though you’ll miss that signature tang. And if fresh garlic isn’t handy, garlic powder is an easy swap—just use about 1 teaspoon.
Nutrition Facts
- Calories: Approximately 320 per serving
- Protein: 35g
- Fat: 18g (mostly from olive oil and chicken thighs)
- Carbohydrates: 4g
- Fiber: 1g
- Sugar: 2g (naturally occurring from peppers)
- Sodium: About 600mg (mainly from pepperoncini juice and olives)
For families watching their sodium intake, rinsing the pepperoncini before cooking can help tone it down a bit, though you’ll lose some flavor punch. Just a heads-up from my personal trial-and-error: balance is key. Learn more: Garlic Cauliflower Mushroom Skillet A Flavor-Packed Veggie Delight
Print
One-Pan Pepperoncini Chicken Skillet Recipe for Easy Flavor-Packed Dinners
Learn how to make delicious Pepperoncini Chicken Skillet. Easy recipe with step-by-step instructions.
- Total Time: 45 minutes
- Yield: 4 servings 1x
Ingredients
- 4 boneless, skinless chicken thighs (you can use breasts if preferred, but thighs stay juicier)
- 1 jar (about 7 ounces) pepperoncini peppers with juice
- 2 tablespoons olive oil
- 3 cloves garlic, minced
- 1 teaspoon dried oregano
- 1 teaspoon dried basil
- 1/2 teaspoon crushed red pepper flakes (optional, for extra heat)
- Salt and freshly ground black pepper, to taste
- 1/2 cup chicken broth (or water as a quick substitute)
- 1/4 cup sliced green olives (optional, but adds a nice briny punch)
- Fresh parsley, chopped, for garnish
If you’re short on pepperoncini, mild banana peppers can work in a pinch, though you’ll miss that signature tang. And if fresh garlic isn’t handy, garlic powder is an easy swap—just use about 1 teaspoon.
Instructions
- Pat the chicken thighs dry with paper towels and season both sides generously with salt, pepper, oregano, and basil. I learned early on that seasoning well upfront makes a huge difference in flavor, even in quick dishes like this.
- Heat olive oil in a large skillet over medium-high heat. Once shimmering, add the chicken thighs and sear for about 4-5 minutes on each side, until golden brown but not fully cooked through. The key is to get a nice crust without drying out the meat.
- Remove the chicken from the skillet and set aside on a plate.
- Lower the heat to medium, add minced garlic, and sauté for about 30 seconds until fragrant. Be careful not to burn it—burnt garlic is a quick way to ruin a good dish, trust me, I’ve been there.
- Pour in the chicken broth and the entire jar of pepperoncini peppers along with their juice. Add sliced green olives if using, and sprinkle in crushed red pepper flakes if you want that extra kick.
- Bring the mixture to a simmer, scraping up any browned bits from the bottom of the pan. This is where all the flavor magic happens—those browned bits are little flavor bombs.
- Return the chicken thighs to the skillet, nestling them into the sauce. Cover the skillet with a lid and let everything simmer gently for about 15-20 minutes, or until the chicken reaches an internal temperature of 165°F and is tender.
- Remove the lid, increase heat to medium-high, and let the sauce reduce for another 3-5 minutes until slightly thickened. This step concentrates the tangy flavors and gives the sauce a nice sheen.
- Sprinkle freshly chopped parsley over the top and serve immediately. I like this final touch because it adds a fresh pop of color and a little brightness to the dish.
- Prep Time: 15 minutes
- Cook Time: 30 minutes
- Category: Main Dish
- Method: Cooking
- Cuisine: International
Keywords: Pepperoncini Chicken Skillet, recipe, cooking, food
Steps to Create Your Pepperoncini Chicken Skillet
- Pat the chicken thighs dry with paper towels and season both sides generously with salt, pepper, oregano, and basil. I learned early on that seasoning well upfront makes a huge difference in flavor, even in quick dishes like this.
- Heat olive oil in a large skillet over medium-high heat. Once shimmering, add the chicken thighs and sear for about 4-5 minutes on each side, until golden brown but not fully cooked through. The key is to get a nice crust without drying out the meat.
- Remove the chicken from the skillet and set aside on a plate.
- Lower the heat to medium, add minced garlic, and sauté for about 30 seconds until fragrant. Be careful not to burn it—burnt garlic is a quick way to ruin a good dish, trust me, I’ve been there.
- Pour in the chicken broth and the entire jar of pepperoncini peppers along with their juice. Add sliced green olives if using, and sprinkle in crushed red pepper flakes if you want that extra kick.
- Bring the mixture to a simmer, scraping up any browned bits from the bottom of the pan. This is where all the flavor magic happens—those browned bits are little flavor bombs.
- Return the chicken thighs to the skillet, nestling them into the sauce. Cover the skillet with a lid and let everything simmer gently for about 15-20 minutes, or until the chicken reaches an internal temperature of 165°F and is tender.
- Remove the lid, increase heat to medium-high, and let the sauce reduce for another 3-5 minutes until slightly thickened. This step concentrates the tangy flavors and gives the sauce a nice sheen.
- Sprinkle freshly chopped parsley over the top and serve immediately. I like this final touch because it adds a fresh pop of color and a little brightness to the dish.
Tips for Making the Best Pepperoncini Chicken Skillet
Over the years, my kitchen has seen its fair share of rushed dinners and “winging it” moments. Here are some tips that have saved me and could help you too:
- Use bone-in chicken thighs if you have the time: They take a bit longer to cook but add extra juiciness and flavor. If you’re short on time, boneless works perfectly fine.
- Don’t skip the sear: It builds flavor and texture that you just can’t get if you throw everything in raw. Plus, it creates those tasty browned bits that make the sauce sing.
- Adjust the heat level: If your kids are sensitive to spice, leave out the crushed red pepper flakes. If you love a little kick, consider adding a pinch more or serve with hot sauce on the side.
- Make it your own: I often throw in whatever veggies I have on hand—sliced bell peppers or some onions—and it turns this dish into a one-skillet meal that feeds the whole crew.
- Don’t stress perfection: Sometimes the pepperoncini juice can be a bit saltier or more tangy depending on the brand. Taste the sauce before serving and adjust with a splash of water or a pinch of sugar if needed.
Serving Suggestions and Pairings

In my house, this Pepperoncini Chicken Skillet is a chameleon. It pairs beautifully with simple sides that soak up that tangy sauce and balance its zest:
- Buttery mashed potatoes: The creamy texture is perfect for mopping up every last drop of sauce.
- Steamed white or brown rice: A classic, no-fuss side that stretches the meal easily for hungry kids.
- Crusty bread or garlic bread: Because who doesn’t love dipping bread into a good sauce?
- Roasted or steamed green beans: Adds a fresh crunch and a pop of color to the plate.
- Simple salad: A light green salad with a lemon vinaigrette helps cut through the richness.
One of my favorite memories is serving this skillet to friends who dropped by unexpectedly. I threw together a quick salad and some toasted baguette slices, and suddenly, a hectic night felt like a small dinner party. That’s the kind of flexible, welcoming meal this recipe invites.
Storage and Reheating Tips
Life with kids means leftovers are inevitable, and sometimes, a blessing. Here’s how to keep your Pepperoncini Chicken Skillet tasting fresh:
- Let the skillet cool to room temperature before transferring to an airtight container.
- Store in the refrigerator for up to 3 days. The flavors actually deepen overnight, so leftovers can be even better.
- Reheat gently on the stovetop over medium-low heat, adding a splash of water or broth if the sauce has thickened too much.
- Avoid the microwave if possible, as it can dry out the chicken. But if you’re in a hurry, cover the dish with a microwave-safe lid and reheat in short bursts, stirring in between.
- Freezing is possible but can slightly change the texture of the chicken. If freezing, use a freezer-safe container and consume within 2 months for best quality.
Frequently Asked Questions
What are the main ingredients for Pepperoncini Chicken Skillet?
The main ingredients for Pepperoncini Chicken Skillet include the items listed in our ingredients section above. Each ingredient plays a crucial role in achieving the perfect flavor and texture.
How long does it take to make Pepperoncini Chicken Skillet?
The total time to make Pepperoncini Chicken Skillet includes both preparation and cooking time. Check the recipe card above for exact timing details.
Can I make Pepperoncini Chicken Skillet ahead of time?
Yes, Pepperoncini Chicken Skillet can often be prepared in advance. Store it properly in an airtight container in the refrigerator and consume within the recommended timeframe.
What can I serve with Pepperoncini Chicken Skillet?
Pepperoncini Chicken Skillet pairs well with various sides and accompaniments. Consider the serving suggestions mentioned in the recipe for the best dining experience.
Is Pepperoncini Chicken Skillet suitable for special diets?
Depending on the ingredients used, Pepperoncini Chicken Skillet may be adapted for various dietary needs. Check the ingredients list and consider substitutions as needed for your dietary requirements.
Final Thoughts
Coming from a background where food was always about bringing people together, the Pepperoncini Chicken Skillet hits all the right notes for me. It’s quick enough for weeknights when the clock is ticking and the kids are hungry, but it carries the kind of bold, comforting flavor that turns an ordinary dinner into a memory. I love that it’s adaptable, straightforward, and forgiving—just like home cooking should be.
“Home cooking isn’t about perfection. It’s about messy counters, full plates, and feeding your people with love—one imperfect meal at a time.”
If you’re looking for a recipe that fits into the beautiful chaos of family life and still leaves you feeling proud and satisfied, this Pepperoncini Chicken Skillet is an easy win. Trust me, it’s become a staple in my kitchen for all the right reasons, and I hope it finds a happy spot in yours too.